
138: I18n
(view original Railscast)
Other translations:

Internationalization (i18n) was one of the new features introduced in Rails 2.2, and in this episode we’ll show you how to use it by making the page below able to display itself in more than one language.
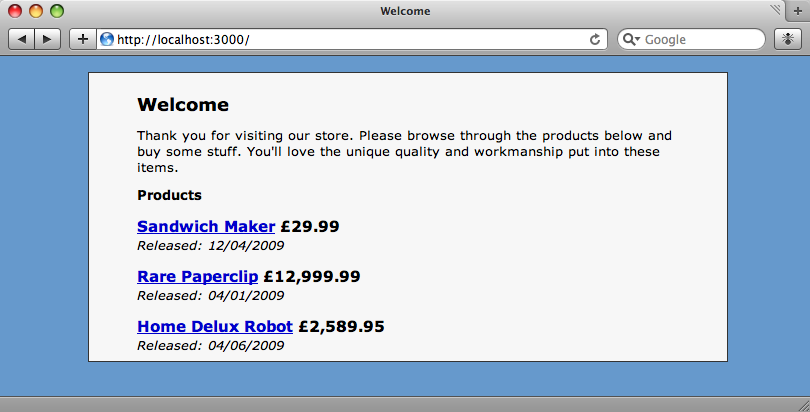
When a user signs up to use our site we’re going to give them the option of choosing the language they want the site to use. For this e-commerce site we’re going to give them the choice between English and Wookieespeak.

We’re using the Restful Authentication plugin to manage our users and the form above is the one that the plugin generates. We’ve added a new field to the User model called language and added a dropdown field to the form that allows the user to set their preferred language. The value of each option is a two-letter language code that for the purposes of this example we’ve just hard-coded into the view.
<li>
 <%= form.label :language, "Language" %>
 <%= form.select :language, [['English', 'en'], ['Wookieespeak', 'wk']] %>
</li>
Creating Locales
Applications created with Rails 2.2 or later will have a directory called locales under the config directory and its here that the files for each language the application is going to support go. Each language’s texts are stored in a YAML file and there will be an English file called en.yml created as an example.
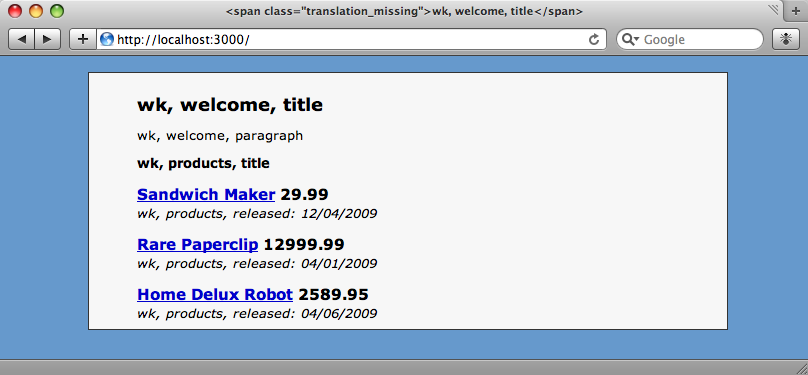
To internationalize our page we’ll first need to copy each piece of text that we want to translate from the products page into the en.yml file.
en:
  welcome:
    title: "Welcome"
    paragraph: "Thank you for visiting our store. Please browse through the products below and buy some stuff. You'll love the unique quality and workmanship put into these items."
  products:
      title: "Products"
      released: "Released"
Note that the YAML keys can be nested so we’ve split the texts up in to two sections, welcome and products. With the English texts in place the next thing to do is to create a Wookieespeak file to hold the translations. These go in a file called wk.yml in the same directory.
wk:
welcome:
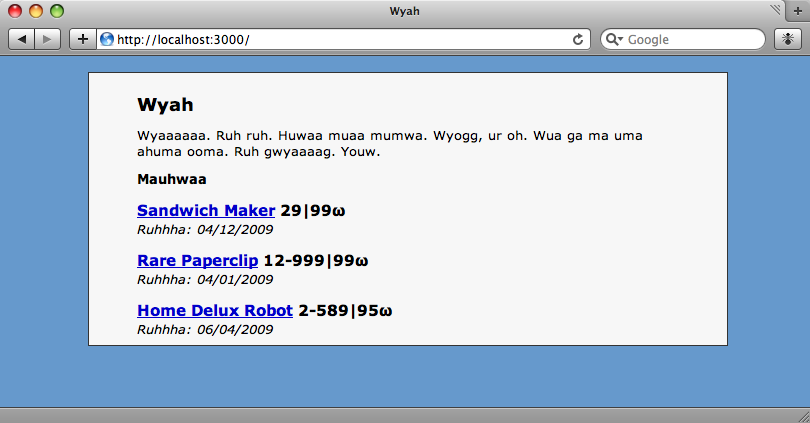
title: "Wyah"
paragraph: "Wyaaaaaa. Ruh ruh. Huwaa muaa mumwa. Wyogg, ur oh. Wua ga ma uma ahuma ooma. Ruh gwyaaaag. Youw."
products:
title: "Mauhwaa"
released: "Ruhhha"
Apologies if the translation isn’t quite correct, but I don’t speak Wookiee.
Adding The Placeholders
Now that we have the YAML files for each language we can replace the hard-coded text in the page with placeholders that point to the translations. Rails provides a method called t which takes the translation’s identifier as an argument. Once we’ve replaced the texts our index page now looks like this:
<% title t('welcome.title') %>
<p><%= t 'welcome.paragraph' %></p>
<h2><%= t 'products.title' %></h2>
<% @products.each do |product| %>
  <h3>
    <%= link_to h(product.name), product %>
    <%= number_to_currency product.price, :unit => "£" %>
  </h3>
  <div class="date_released">
    <em><%= t 'products.released' %>: <%= product.release_date.strftime("%d/%m/%Y") %></em>
  </div>
<% end %>
If we reload our page now it will look exactly the same, but instead of the static text we had before we’re seeing the English versions of our localized texts.
Changing The Language
Now that we have two languages we’ll need to provide a way to switch between them. We can do this using a before filter in the application’s controller that calls a method to set the language.
class ApplicationController < ActionController::Base
  helper :all
  protect_from_forgery
  before_filter :set_user_language
  private
  def set_user_language
    I18n.locale = 'wk'
  end
end
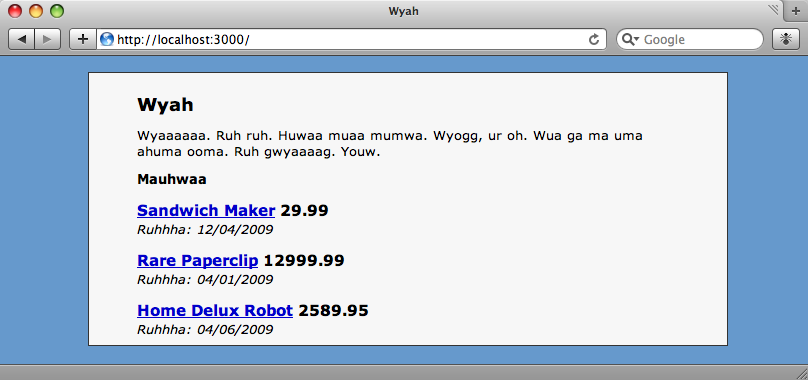
To test the Wookiee translations we’ll hard-code the value of the locale to the code we used for Wookieespeak and reload the page.
The page changes, but we’re not seeing the translations. The reason for that is that the localised texts are loaded when the application starts up. We’ll need to restart the server to see the Wookiespeak text.
Setting The Language From The User’s Preferences
Our translations now work but the language used is hard-coded in the application controller. We need to use the language preference set by the user so that they can see the site in their preferred language. As we’re using Restful Authentication we can use current_user to retrieve the logged in user and then get their language. We can modify the set_user_language method in the application controller to set the current locale from the user’s language if there is a logged-in user.
def set_user_language
    I18n.locale = current_user.language if logged_in?
end
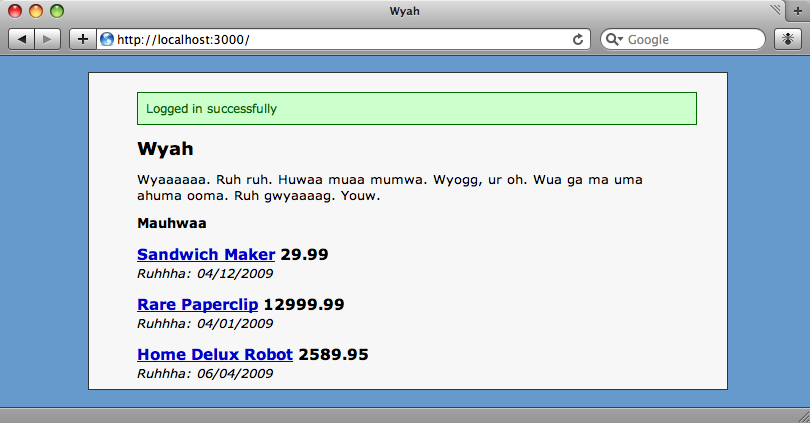
If we look at the page while not logged in then the user interface will show the default language, English, but if we log in as a user whose preferred language is Wookiee then we’ll see the translations.
Two Final Steps
Although most of the text is translated, there are still a couple of problems with the page: the flash text that shows at the top of the page isn’t localized and the prices have lost their currency symbol.
We can fix the problem with the flash message by adding new texts to our two language files. We’ll add this key to the en.yml file.
flash:
  login: "Logged in successfully."
and this one to wk.yml.
flash:
  login: "Wohooohaa"
Then in the sessions controller file we’ll need to update the code that sets the flash message. In the create method we’ll change the line the line the sets the flash to:
flash[:notice] = t("flash.login")
Note that we have access to the t method in the controller as we had in the view. If we need to translate something outside a controller or view then t is just a shortcut for I18n.translate so that can be used elsewhere.
We can restore the missing currency symbols by using one of the reserved keys that the language YAML files use. There are a number of keys for defining things like dates, times and number formatting. At the top of the English language file is a link to a Github repository that has a large number of example files for many different languages. We’ll make up some symbols and formats for the Wookiee culture and add them to the file.
number:
  format:
    precision: 3
    separator: '|'
    delimiter: '-'
  currency:
    format:
      unit: 'ω'
      precision: 2
      format: '%n%u'
When we refresh the page now we’ll see the number formats and currencies in Wookiee. If this was a proper online shop we’d need to handle the differing coversion rates between currencies, but for our demonstation the different currency symbol and price formatting will do.
This episode has only covered the basics of internationalization in Rails. There are a number of other parts of the site that could be localized, for example the date formats and the error messages that are displayed by the validations. Checkout the documentation for more details.