
136: jQuery
(view original Railscast)
Other translations:


In episode 43 we showed how to update multiple elements on a page in the response from an AJAX request. We used the Prototype libraries and form_remote_for to submit a form asynchronously and RJS to generate the JavaScript that would update the elements on the page in the response. In this episode we’re going to use jQuery, rather than Prototype and RJS, to do the same thing.
As we’re using jQuery we won’t be able to use RJS or any of the helper methods such as form_remote_for that Rails provides. If we still wanted to be able to use RJS there is a plugin called jRails that will rewrite those methods to work with jQuery, but we’re going to use jQuery on its own as it provides a way of writing unobtrusive JavaScript to enhance our Rails application.
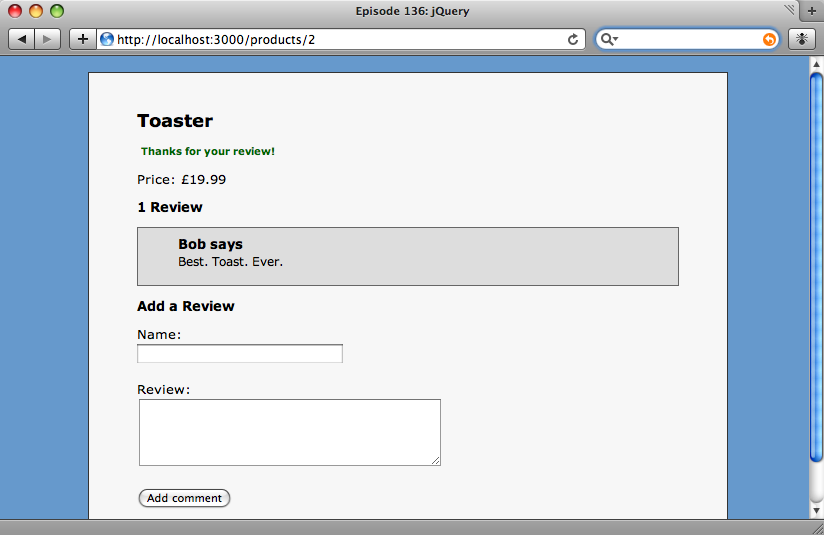
We’ll be working with the same application we used before. The page below shows a product and allows customers to add reviews for it. When a new review is added it appears in the reviews list, the text showing the number of reviews is updated, the form is reset and a flash message is shown thanking the user for adding their review.
The application currently posts back and reloads the page when a product is added. We’re going to write some jQuery code to make the form send its data back via an AJAX request and then update the page without it having to be reloaded.
Adding jQuery To Our Application
The first thing we’ll need to do is add the jQuery library to our application. It can be downloaded from the jQuery website and once downloaded it belongs in the public/javascripts directory. Next, we’ll need to reference it from our application’s layout page by putting the following line into the <head> section.
<%= javascript_include_tag ['jquery-1.3.2', 'application'] %>
Each release of jQuery is available in two versions; one for development and a minified version for production. It’s best to use the development version when you’re developing your site as it makes debugging your jQuery code easier. As well as the jQuery file we’ll also need to reference the application.js file as it’s here that we’ll be putting our jQuery code. Note that the jQuery file is added first so that it’s loaded before the application’s JavaScript file.
Adding Unobtrusive JavaScript
To add JavaScript unobtrusively we don’t want to modify the code in our view files at all. Instead we’ll be using jQuery to modify the behaviour of elements on the page dynamically. We’ll start off by writing a function that will run when the form is submitted.
Our form has an id of new_review. The code below will cause it to be submitted via AJAX.
   $(document).ready(function (){
     $('#new_review').submit(function (){
       $.post($(this).attr('action'), $(this).serialize(), null, "script");
       return false;
     });
   });
The first line in the above code creates a function that will be run when the document’s object model is loaded. The second line finds our form by its id and creates a function that will run when the form is submitted. The third line creates the AJAX request that will be POSTed to the server. The $.post function takes four arguments. The first is the URL that will be posted to, for which we supply the value of the form’s action attribute. The second argument is the data that should be posted. For this we use jQuery’s serialize method which will handily serialize the form’s elements as a series of key / value pairs for sending to the server. The next argument is a callback function that will be executed when the AJAX request completes, but we won’t be using that so we’ve supplied null. The reason we don’t have a callback function is that we can tell the function that we’re returning JavaScript that should be run by the browser and we do this by supplying “script” as the fourth argument. For more details about $.post see the jQuery documentation. Finally we return false so that the default submit action doesn’t fire.
Updating The Controller
Now that we have our form submitting via AJAX we’ll have to modify our reviews controller so that it can deal with both HTML and JavaScript requests. Currently it saves the new review then redirects to the product’s page. A redirect makes no sense in the context of a JavaScript request so the page will need to respond differently for these. We’ll use respond_to to set up two different blocks.
   def create
     @review = Review.create!(params[:review])
     flash[:notice] = "Thanks for your review!"
     respond_to do |format|
       format.html { redirect_to @review.product }
       format.js
     end
   end
The js block is empty as all it needs to do is return the JavaScript we create. This will live in a file called create.js.erb in the /app/views/reviews directory. Without jRails we can’t use RJS with jQuery, so we’re using a js.erb file instead. To get going we’ll add a simple alert to create.js.erb to test that our code works.
alert('Hello from AJAX');
Before we test it, there’s one more thing we need to do. As it stands the code won’t work, and the reason for that is that Rails doesn’t know what format the request that jQuery sends is in, so defaults to HTML. We’ll need to tell Rails that we’re sending a JavaScript request.
There are two ways to do this. We could add a .js extension to the URL the AJAX request makes, or we could use jQuery’s ajaxSetup method to set the request header so that it only accepts JavaScript. This second method has the advantage that it only needs to be done once and it will work for every AJAX request in our code. We’ll do that by adding the line below to the top of application.js.
   jQuery.ajaxSetup({
   	'beforeSend': function (xhr) {xhr.setRequestHeader("Accept", "text/javascript")}
   });
Adding the header will tell Rails to call the js block and return the contents of the js.erb file. We can now refresh the page and try adding a review.
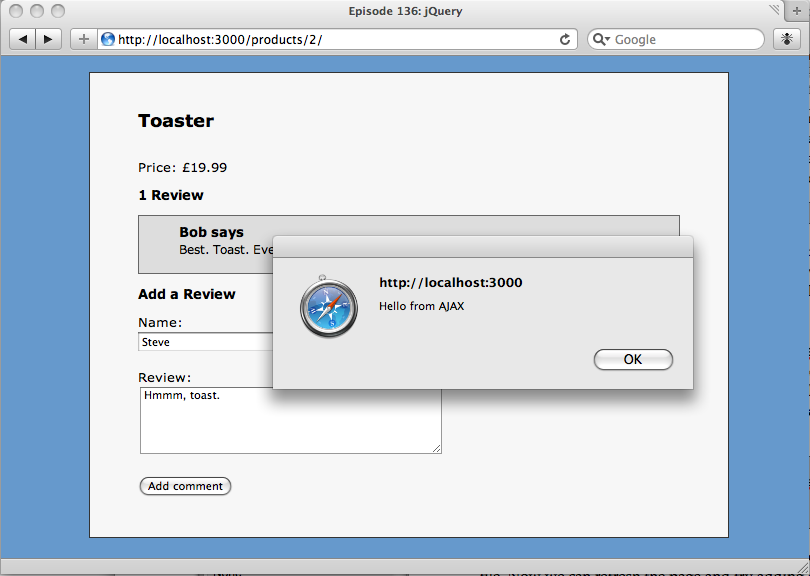
The response from create.js.erb in the browser.
Updating The Page
The alert shows, so we know that our create.js.erb file is being returned and executed by the browser. We can now replace the alert with the jQuery code that will update the page after a new review has been added. There are four things we want to do.
First we’ll add the flash message to the page that thanks the user for adding their review. We’ll do this by adding a div before the form.
$('#new_review').before('<div id="flash_notice"><%= escape_javascript(flash.delete(:notice)) %></div>');
To add dynamic content we just use erb tags embedded in the JavaScript.
We use escape_javascript to make anything output from erb JavaScript safe. Note that we’re calling flash.delete to clear the flash message immediately so that it is not redisplayed in the next request.
The element that holds the reviews count will also need to be updated. It has an id of reviews_count and jQuery’s html method can be used to update its contents.
$('#reviews_count').html('<%= pluralize(@review.product.reviews.count, "Review") %>');
Next we’ll add the new review to the list. The reviews are displayed in an ordered list with an id of reviews. Each review is rendered as a list item from a partial. To add our new review we can render the partial for our new review and append it to the list.
$('#reviews').append("<%= escape_javascript(render(:partial => @review)) %>");
And finally, we’ll reset the form.
$('#new_review')[0].reset();
The jQuery function, $, returns a jQuery object. To get at the actual DOM element it represents we get the first element from the array. We then call reset() on it to clear the form.
Extending jQuery
To finish this episode we’ll show you how easy it is to add your own functions to jQuery. We currently have some jQuery code that runs when the form is submitted.
   $('#new_review').submit(function (){
       $.post($(this).attr('action'), $(this).serialize(), null, "script");
       return false;
   });
If we wanted to do this across several forms on our site we can extract that code out into a new jQuery function so that we could call
$('#new_review').submitWithAjax();
instead. jQuery is easy to extend with custom functions. We can create our new function by writing
   jQuery.fn.submitWithAjax = function () {
     this.submit(function () {
       $.post($(this).attr('action'), $(this).serialize(), null, "script");
       return false;
     });
   };
That’s all we have to do. Now we can submit any form asynchronously by calling submitWithAjax on it.