
205: Unobtrusive JavaScript
(view original Railscast)
Other translations:


In this episode in our series on the new features in Rails 3 we’re going to look at how it makes use of unobtrusive JavaScript. Unobtrusive JavaScript is a technique for separating the behaviour of a web application from its content in a similar way that CSS allows us to separate presentation from content. Before we start using unobtrusive JavaScript in Rails we’ll show you an example in a simple HTML document.
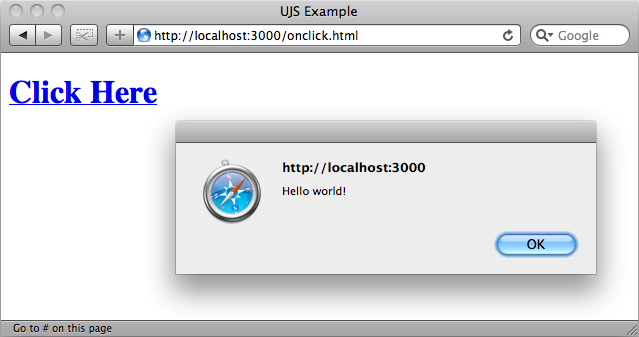
The screenshot below shows a webpage that has a link on it. When the link is clicked a JavaScript alert is shown that says “Hello world!”.
The HTML for the page looks like this:
<!DOCTYPE html>
<html>
  <head>
    <title>UJS Example</title>
  </head>
  <body>
    <h1><a href="#" onclick="alert('Hello world!'); return false;">Click Here</a></h1>
  </body>
</html>
In the page we have a link with an onclick attribute that contains some JavaScript code. As the script is contained inline within the HTML it is not unobtrusive and this is a bad thing because we’re mixing content and behaviour. Back in the 1990s web pages were often designed using the <font> element to set the typeface, size and colour of text as we didn’t have CSS. This meant that if we wanted to change the size of all of the paragraph text across a site we’d have to make potentially hundreds of changes. When browsers began to support CSS we could move this styling information out into stylesheets and therefore make the look of a site much easier to maintain.
The same applies with JavaScript. Putting small pieces of JavaScript in the attributes of the HTML elements on a page mixes concerns and makes websites difficult to update. Moving JavaScript out into separate files reduces duplication, makes refactoring possible and makes it much easier to write and debug complex web applications.
How do we make the JavaScript in our simple example unobtrusive? The main step is to move the JavaScript in the onclick attribute into a separate file and to use a JavaScript framework, in this case jQuery, to wire up the scripts to events on elements. We’ll show you the modified page and then explain the changes we’ve made.
<!DOCTYPE html>
<html>
  <head>
    <title>UJS Example</title>
    <script src="http://ajax.googleapis.com/ajax/libs/jquery/1.4.2/jquery.min.js" type="text/javascript" charset="UTF-8"></script>
    <script type="text/javascript"charset="UTF-8">
      $(function () {
        $('#alert').click(function () {
          alert('Hello, world!');
          return false;
        })
      });
    </script>
  </head>
  <body>
    <h1><a href="#" id="alert">Click Here</a></h1>
  </body>
</html>
The first thing to note is that despite what we said earlier we’ve not moved the JavaScript out into a separate file, but this is only to make it more easy to show the changes.
In the link element in the body we’ve removed the onclick attribute and replaced it with an id so that we can target the link from the jQuery code. Then, in the head section we’ve added a reference to the jQuery library and, below that, the script that should be in the external file. The script starts by calling jQuery’s $ function with a function as an argument. The function in the argument will be called when the page’s DOM loads and the code in it contains one line of jQuery code that finds the link by its id and attaches a function to its click event. That function contains the alert and then returns false so that the link isn’t followed.
If we reload the page now it will behave exactly as it did before with the alert being shown when the link is clicked.
It might seem that we’ve had to do a lot of work here for not much effect but the simple example we’ve used doesn’t really show the advantage of unobtrusive JavaScript as we’ve taken one line of inline JavaScript and turned it into six. This example isn’t meant to prove the advantage of unobtrusive JavaScript but just to show how it’s done and how to compare it. The benefits of unobtrusive JavaScript won’t really appear until our web application has a lot more JavaScript in it as then the advantages of having all of the scripts in a separate file and being able to remove duplication begin to show themselves.
One problem with this approach is that the JavaScript is usually located in a static JavaScript file. How do we insert dynamic server-side content into the JavaScript now that we can’t do it inline?
In HTML 5 we can use custom data attributes to store data related to an element on a page. These are the same as any other attributes but the name must begin with data-. To store the message that is shown when the link is clicked in a data attribute we can rewrite the link thus:
<a href="#" id="alert" data-message="Hello from UJS">Click Here</a>
In the JavaScript we can then alter the alert to show the text from our new attribute:
$(function () {
  $('#alert').click(function () {
    alert(this.getAttribute('data-message'));
    return false;
   })
});
If we reload the page now we’ll see the message from the data attribute.

How Rails 3 Uses Data Attributes
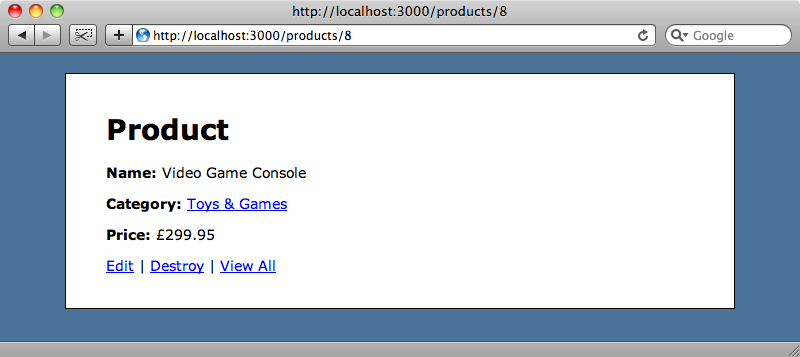
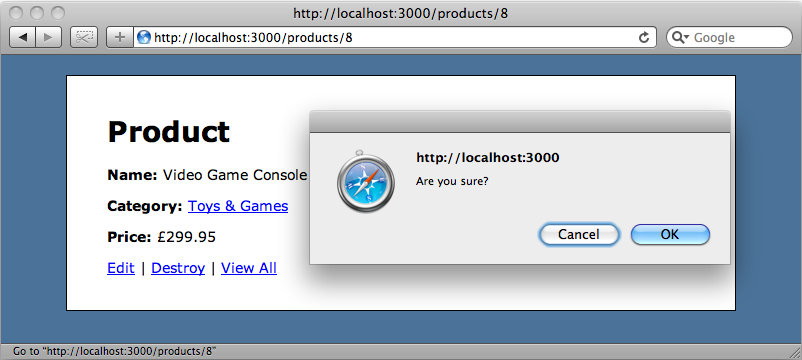
Rails 3 uses these custom data attributes in its approach to unobtrusive JavaScript as a way of passing data to JavaScript. We’ll take a look now at how this applies to a Rails 3 application. Our application is a basic e-commerce app that has a list of products that can be searched against. There are also links to edit and destroy products and it’s when we try to destroy a product that we find a problem as the link seems not to work.
This is a common problem with Rails 3 apps. If you’re just setting one up or moving an application over from an earlier version of Rails then you may well find that some parts of the application that use JavaScript don’t work.
The code in the view that generates the “Destroy” link is a standard link_to method with a :confirm option to display a JavaScript confirm alert and a :method option that is set to :delete so that the request is submitted as a DELETE request rather than as a GET.
/app/views/products/show.html.erb
<%= link_to "Destroy", @product, :confirm => "Are you sure?", :method => :delete %>
What’s interesting here is the HTML source that this code generates:
<a href="/products/8" data-confirm="Are you sure?" data-method="delete" rel="nofollow">Destroy</a>
In Rails 2 using link_to to create a destroy link generates a lot of inline JavaScript to create the confirm dialogue box and a form that would simulate a DELETE or PUT request. By comparison the Rails 3 code is much neater and makes use of the HTML 5 data attributes we showed earlier, creating one called data-confirm that holds the confirmation message and another called data-method that holds the method.
The reason that the link isn’t working is that we don’t have the relevant JavaScript files referenced in the head section of the page so the link will behave as a standard link and perform a GET request as there’s nothing telling it to do otherwise.
To fix this we’ll need to add the following two lines in the head section of our application’s layout file:
/app/views/layouts/application.html.erb
<%= javascript_include_tag :defaults %>
<%= csrf_meta_tag %>
The first line above should be familiar. It includes the standard JavaScript files for a Rails application. The second line creates two meta tags that hold the authenticity token that is necessary to make DELETE requests. If we reload the page and look at the source we’ll see the HTML that these two lines have generated.
<script src="/javascripts/prototype.js?1268677667" type="text/javascript"></script>
<script src="/javascripts/effects.js?1268677667" type="text/javascript"></script>
<script src="/javascripts/dragdrop.js?1268677667" type="text/javascript"></script>
<script src="/javascripts/controls.js?1268677667" type="text/javascript"></script>
<script src="/javascripts/rails.js?1268677667" type="text/javascript"></script>
<script src="/javascripts/application.js?1268677667" type="text/javascript"></script>
<meta name="csrf-param" content="authenticity_token"/>
<meta name="csrf-token" content="9ImdFvbeW7ih9oKqBDQ3O889q/hJ1q5uajpT4DFDAoA="/>
In the page now we have all of the JavaScript files our application needs and two meta tags that are necessary for preventing cross-site request forgeries. These ensure that the PUT and DELETE requests come from the correct user and not from another site or hacker.
With these two items in place our delete link will now work as we expect it to.
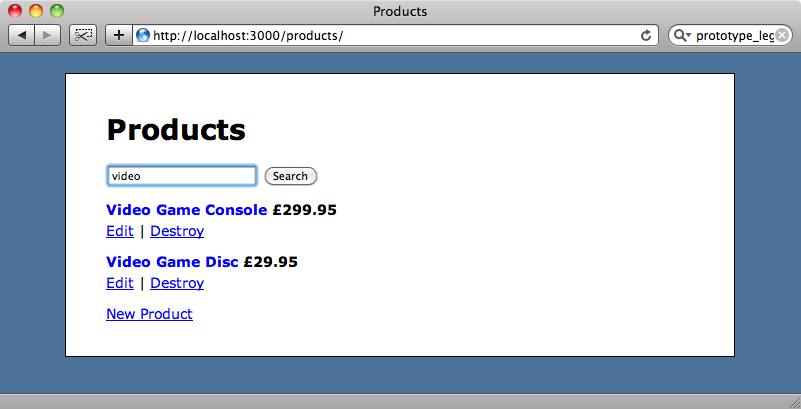
Adding AJAX to The Search Form
Next we’ll modify the search form on the index page so that it makes use of AJAX when it’s submitted rather than making a GET request. The code for the index view that contains the form is shown below:
/app/views/products/index.html.erb
<% title "Products" %>
<% form_tag products_path, :method => :get do %>
  <p>
    <%= text_field_tag :search, params[:search] %>
    <%= submit_tag "Search", :name => nil %>
  </p>
<% end %>
<div id="products">
  <%= render @products %>
</div>
<p><%= link_to "New Product", new_product_path %></p>
The form that is used here for searching uses the technique that was used in episode 37. In earlier versions of Rails to get the form working via AJAX we would have replaced the form_tag with form_remote_tag. This method generates a lot of inline JavaScript, however, which is exactly what we’re trying to avoid.
A lot of the remote helper methods are no longer available in Rails 3. To get them back we could install the Prototype Legacy Helper plugin instead we’re going to use the new Rails 3 approach.
To do this instead of using form_remote_tag we stick with form_tag, but add a new parameter called :remote.
/app/views/products/index.html.erb
<% form_tag products_path, :method => :get, :remote => true do %>
  <p>
    <%= text_field_tag :search, params[:search] %>
    <%= submit_tag "Search", :name => nil %>
  </p>
<% end %>
This :remote parameter can also be used with other helper methods such as link_to, button_to and form_for. If we reload the page and look at the source we can see how the new form code works.
<form action="/products" data-remote="true" method="get">  <p>
    <input id="search" name="search" type="text" />
    <input type="submit" value="Search" />
  </p>
</form>
The form element is the same as it was before the remote parameter was added but has a new data-remote attribute. There’s no inline JavaScript, the new attribute is enough to tell the JavaScript in rails.js that the form should be submitted via AJAX.
Next we need to write code to handle the response from the AJAX call. The list of products is contained in a div with an id of products so we can update the contents of this div to display the relevant products. The form is submitted to the ProductController’s index action and all we need to do is add a new view template to handle JavaScript requests called index.js.erb.
We can write any JavaScript we like in this template file and it will be execute when it is returned to the browser. The code in the new template will update the contents of the products div with the list of products.
/app/views/products/index.js.erb
$("products").update("<%= escape_javascript(render(@products))%>");
When we reload the page and submit the form the search will be made with an AJAX call and we can see this as the page’s URL doesn’t change when the search is made.
So in Rails 3, AJAX is easy to do unobtrusively by using the :remote parameter and executing the JavaScript that is returned from the server.
Swapping Frameworks
We’ll wrap up this episode by showing you how to swap the JavaScript framework that our application uses. Our application currently uses Prototype which comes as part of the default with Rails, but what if we want to use jQuery instead?
First we’ll need to replace this line in our application layout.
/app/views/layouts/application.html.erb
<%= javascript_include_tag :defaults %>
with this:
/app/views/layouts/application.html.erb
<%= javascript_include_tag "http://ajax.googleapis.com/ajax/libs/jquery/1.4.2/jquery.min.js", "jquery.rails.js" %>
The first file in the list is the latest version of jQuery from Google. This isn’t enough by itself though as we need a jQuery equivalent of the rails.js file we’ve been using before for handling the unobtrusive JavaScript that’s specific to Rails. We can find the official version of that on the jquery-ujs project on Github. This project contains a rails.js file that we can download and use in our projects. We’ve downloaded it to our application’s /public/javascripts directory and renamed it as jquery.rails.js and this file will handle all of the unobtrusive JavaScript that Rails uses.
Now we have to alter any JavaScript we’ve written in our application that makes use of Prototype to use jQuery-compatible code instead. We’ll need to make two small changes to the code in index.js.erb that we created earlier, using #products instead of products as the selector for the products div and replacing Prototype’s update method with jQuery’s equivalent html.
/app/views/products/index.js.erb
$("#products").html("<%= escape_javascript(render(@products))%>");
Our application will now work exactly as it did before but with jQuery under the hood rather than Prototype.
Degrading Gracefully
If a user views our application using a browser that doesn’t have JavaScript enabled the form will degrade gracefully and make a normal GET request when it is submitted. Destroying products will not work, however. This is a common problems caused by the fact that HTML links can only make GET requests, so Rails uses some JavaScript to simulate a DELETE. One solution is to replace the link with a button by using button_to but that can look ugly so we want to stick with a link. A preferable technique is the one shown in episode 77 that will show a separate confirmation page before deleting an item when an application is used in a browser that has JavaScript disabled.