
263: Client-side Validations
(view original Railscast)
Other translations:


It can be frustrating to fill in a long form on a website only to have it returned back to you with a number of validation errors after you’ve submitted it. Having any errors for a field show as soon as you’ve completed it provides a much better user experience, but this can involve writing a lot of JavaScript validation code.
In this episode we’ll look at a gem that will allow us to automatically create client-side validations. Let’s say that we have an application with a sign-up form for creating a new User model with four fields like this:
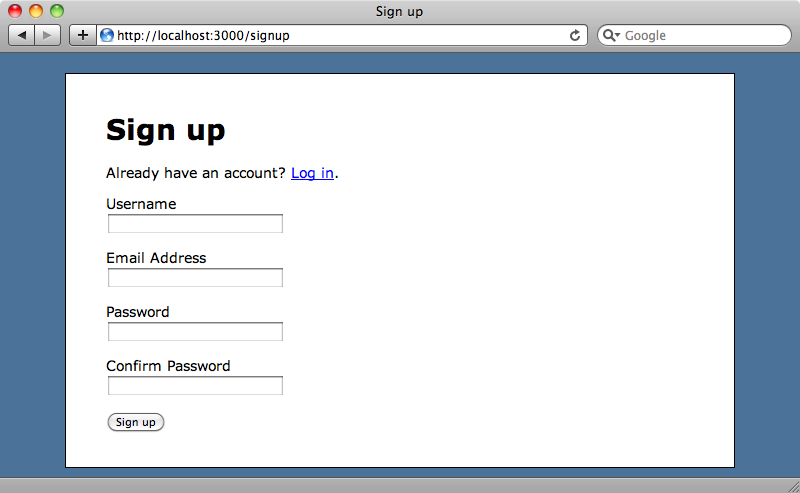
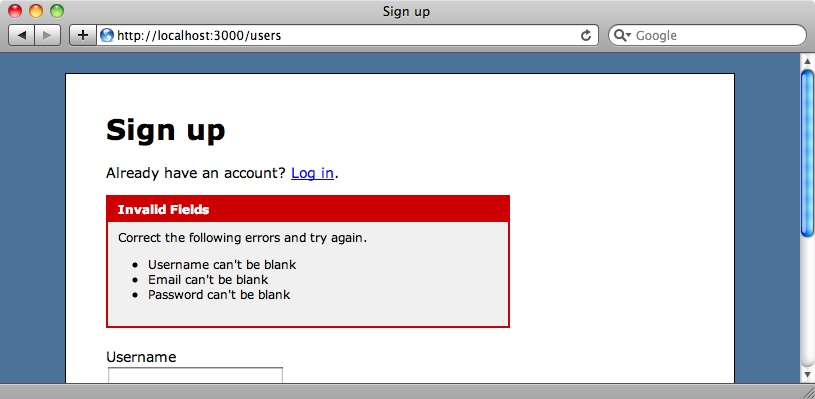
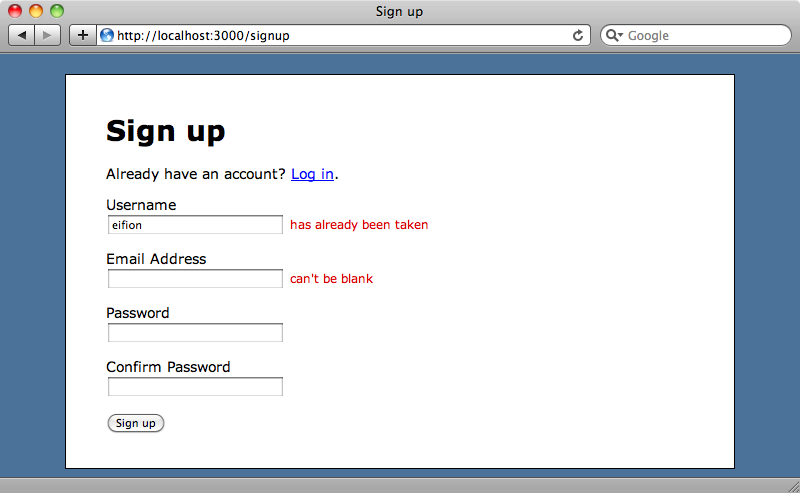
The User model has a number of validators, including some required field validators, so if we submit this form without filling in any of the fields we’ll see a list of validation errors.
As we said before it would be better if we could show any errors for a given field as soon as the user tabs out of that field but writing all of the JavaScript to do this could add up to quite a lot of work, especially if we have a number of models we want to validate this way or if some of the validations are complex. To save us this work we’ll make use of a gem called client_side_validations which will do it for us. This gem reads the validations in a model and generates the JavaScript necessary to create client-side validations that are fired as the user fills in a form for that model. The only non-standard requirement that this gem has is jQuery, so if you’re using Prototype in your Rails applications you’ll need to find an alternative solution.
Installing client_side_validations
To install the gem we just need to add a reference to it in the application’s Gemfile and then run bundle.
/Gemfile
source 'http://rubygems.org'
gem 'rails', '3.0.7'
gem 'sqlite3'
gem 'nifty-generators'
gem 'bcrypt-ruby', :require => 'bcrypt'
gem 'jquery-rails'
gem 'client_side_validations'
Note that we’ve already set up jQuery in the application by adding the jquery-rails gem. Once the client_side_validations gem has installed we’ll need to run the generator that it provides. This adds a couple of files to our application: a configuration file in the config/initializers directory and a JavaScript file that we’ll need to add a reference to in the layout file.
$ rails g client_side_validations:install
    create  config/initializers/client_side_validations.rb
    create  public/javascripts/rails.validations.js
We’ll modify the layout file now. All we need to do is add rails.validations to the list of included JavaScript files.
/app/views/layouts/application.html.erb
<%= javascript_include_tag :defaults, "rails.validations" %>
We’re also going to need to modify client_side_validations’s configuration file. By default it’s configured to use SimpleForm and Formtastic but as we aren’t using either of those we’ll need to uncomment the section at the bottom of the file and override the field_error_proc method.
/config/initializers/client_side_validations.rb
# ClientSideValidations Initializer
require 'client_side_validations/simple_form' if defined?(::SimpleForm)
require 'client_side_validations/formtastic' if defined?(::Formtastic)
# Uncomment the following block if you want each input field to have the validation messages attached.
ActionView::Base.field_error_proc = Proc.new do |html_tag, instance|
  unless html_tag =~ /^<label/
     %{<div class="field_with_errors">#{html_tag}<label for="#{instance.send(:tag_id)}"
  class="message">#{instance.error_message.first}</label> </div>}.html_safe
  else
    %{<div class="field_with_errors">#{html_tag}</div>}.html_safe
  end
end
This method appends a label element containing the error message and with a class of message to any invalid fields. If the default way of displaying errors doesn’t fit in with our application then we can customize the file above to suit.
There’s one more step we need to take. We need to add a :validate => true option to the form_for call for the form to which we want to add the validations. We now have everything in place to get validations working inline.
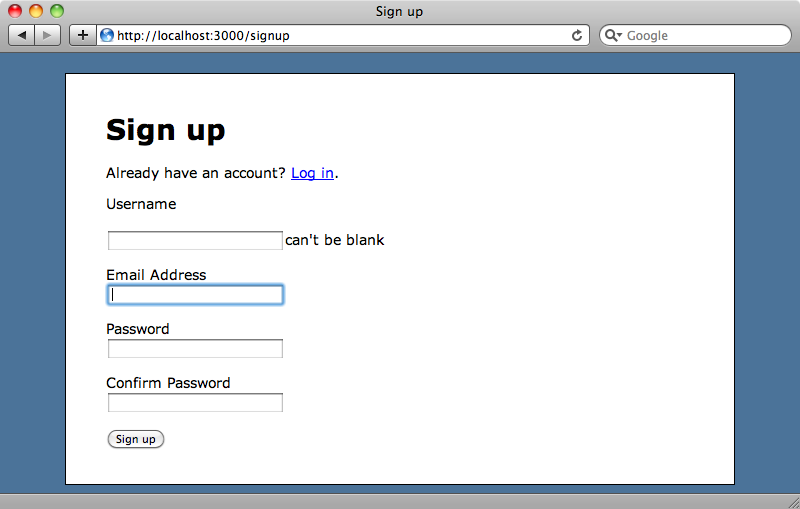
If we reload the signup page now and tab out of the username field without entering a value an error message will be shown inline immediately and the same applies to any other fields with errors.
More Complex Validations
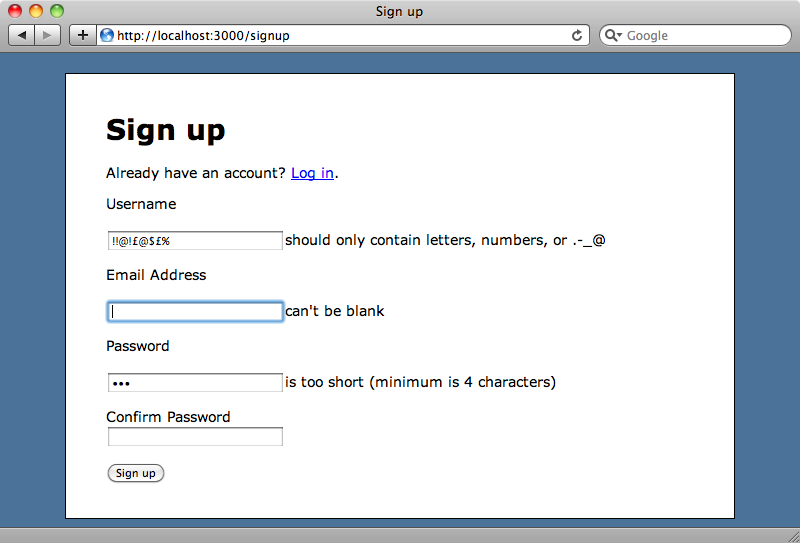
Simple validations work out of the box but what about more complex ones? In the User model we have some other validations, one for the format of the username field that ensures that there are no unusual characters in it, one that checks the length of the password and one that checks that the confirmation matches the password.
/app/models/user.rb
validates_presence_of :username, :email
validates_presence_of :password, :on => :create
validates_presence_of :username, :with => /^[-\w\._@]+$/i, :allow_blank => true, :message => "should only contain letters, numbers, or .-_@"
validates_length_of :password, :minimum => 4, :allow_blank => true
validates_confirmation_of :password
All of these validations are translated to JavaScript by client_side_validations and will just work so if we enter a “bad” username or a password that’s too short we’ll be told about that straight away.
While there are visible errors the form can’t be submitted but once we enter valid values into each field we can submit it and sign up.
Some validations, such as validates_uniqueness_of, need to read data from the database. We want the username and email fields to be unique so let’s add this validation in and see what happens.
/app/models/user.rb
validates_uniqueness_of :username, :email
We’ve already created an account for “eifion” and when we try creating another one the error is picked up as soon as we tab out of the username field.
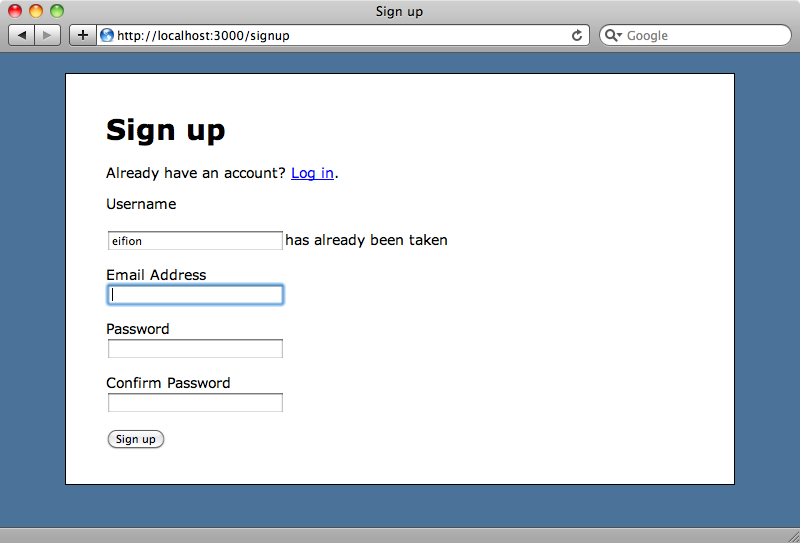
This works because client_side_validations makes an AJAX request when we tab out of the username field so that it can check on the server as to whether that username has already been taken.
Adding Styling
We want to customize the way that the error messages look so we’ll take a look now at the CSS necessary to do that. First we’ll style the field_with_errors class that Rails adds to invalid fields so that these elements are shown inline. The error message for a field is a label element with a class of message and we’ll style these to look a little more like error messages be colouring them red and adding a little padding to the left to move them away from the form element they’re associated with.
/public/stylesheets/application.css
.field_with_errors {
  display: inline;
}
.field_with_errors .message {
  color: #D00;
  padding-left: 5px;
  font-size: 12px;
}
If we reload the sign up page now and cause some errors we’ll see the new styles.
Custom Validations
Back in episode 211 [watch, read] we created a custom validator class called EmailFormatValidator to validate the format of email addresses. How would we go about translating this Ruby validator class into JavaScript so that we can use it on the client like the standard Rails validators?
Thankfully there’s a page on the client_side_validations Wiki that explains exactly how to do this and so we’ll recreate the EmailFormatValidator in this application and then use the information on that page to extend it to work on the client too.
The first step is to add the validator in a file in the application’s /lib directory.
/lib/email_format_validator.rb
class EmailFormatValidator < ActiveModel::EachValidator
  def validate_each(object, attribute, value)
    unless value =~ /^([^@\s]+)@((?:[-a-z0-9]+\.)+[a-z]{2,})$/i
      object.errors[attribute] << (options[:message] || "is not formatted properly")
    end
  end
end
This class checks that the value passed in matches a regular expression and adds an error message to the model’s list of errors if the match fails. We could have used a simple validates_format_of to achieve this, but for the purposes of this example we’ve written a custom validator.
Files in the /lib directory aren’t automatically included in the application in Rails 3. We’ll need to add that directory to the autoload_paths in our application’s application.rb file so that the files in there are added to the load path.
/config/application.rb
require File.expand_path('../boot', __FILE__)
require 'rails/all'
# If you have a Gemfile, require the gems listed there, including any gems
# you've limited to :test, :development, or :production.
Bundler.require(:default, Rails.env) if defined?(Bundler)
module Validator
  class Application < Rails::Application
    config.autoload_paths << "#{config.root}/lib"
    # Configure the default encoding used in templates for Ruby 1.9.
    config.encoding = "utf-8"
    # Configure sensitive parameters which will be filtered from the log file.
    config.filter_parameters += [:password]
  end
end
A custom validator needs to have its default error message defined inside a locales file. The error message needs to be nested under errors/messages and have a key that matches the name of the custom validator, in this case email_format.
/config/locales/en.yml
# Sample localization file for English. Add more files in this directory for other locales.
# See
en:
  errors:
    messages:
      email_format: "is not formatted properly."
We can now add our new validator to the User model, using validates and passing in the name of the field we want to validate and the name of the validator.
/app/models/user.rb
validates :email, :email_format => true
We can replace true in the code above with a hash of options to, say, specify a custom error message, but here we’ll just leave it at the default.
If we enter an invalid email address into the form now and submit it we’ll see the custom validator’s error message but the error doesn’t appear when we tab out of the field. Our validator is working on the server but we need to translate the code in EmailFormatValidator into JavaScript and wire it up to client_side_validation
so that it fires when the email field loses the focus.
We’ll put the code for this validator in a new file in /public/javascripts called rails.validations.custom.js, as the plugin expects a name in this format. In the file we’ll write the code to validate the field on the client.
/public/javascripts/rails.validations.custom.js
clientSideValidations.validators.local["email_format"] = function (element, options) {
  if(!/^([^@\s]+)@((?:[-a-z0-9]+\.)+[a-z]{2,})$/i.test(element.val())) {
    return options.message;
  }
}
In the code above we add our new validator by adding a new local validator called email_format to the clientSideValidations.validators object. Making it local means that all of the validator is performed on the client; if we added it to the remote validations then it would make an AJAX call to the server in the same way that the validates_uniqueness_of validator did earlier.
The validator code validates the email format in the same way that the Ruby code did, by matching the element’s value against a regular expression. If the match fails then the error message is returned. To add the new JavaScript validator to our application we just need to add a reference to the new validator file in the application’s layout.
/app/views/layouts/application.html.erb
<%= javascript_include_tag :defaults, "rails.validations", "rails.validations.custom" %>
Now that all of this is in place we can give it a try. If we reload the page and enter an invalidly formatted email address the error message will be shown as soon as the email field loses the focus.

We now have client-side validation on all of the fields on the form. For users who don’t have JavaScript enabled in their browser the validations still take place on the server.
That’s it for this episode on client side validations. Writing custom validations might seem like a lot of work but once you’ve set up the first one, adding others is pretty straightforward. Getting instant feedback when filling in a form makes for a much better user experience and this is a great way to add them to your Rails applications.