
300: Contributing to Open Source
(view original Railscast)
Other translations:

Github makes it incredibly easy to contribute to open source projects. In this episode we’ll show you how to do so by submitting a pull request to the VCR project. We covered this gem, which provides a way to record HTTP interactions and play them back in order to speed up tests, back in episode 291. Myron Marston, the gem’s author, is very good at keeping up with contributions from other people.
Let’s say that we’ve found an issue with this gem that we’d like to contribute a patch for. The first thing we should do is look at the gem’s issue tracker and make sure that it hasn’t already been addressed. If the project has a mailing list then it’s also a good idea to search this for any items related to the issue we’ve found. For large changes it’s a good idea to discuss it first to see if the change is needed.
Fork It!
Once we’re ready to start on our fix the first step is to fork the project. To do this we need to visit the project’s home page and click the ‘fork’ button. This will give us our own copy of the repository and will take a few seconds to complete but once it has we can visit our new fork and get its URL so that we can clone it.
$ git clone git:eifion/vcr.git
$ cd vcr
When we’ve cloned the repository we should see what branches it has.
$ git branch -r
  origin/1-x-stable
  origin/HEAD -> origin/master
  origin/jruby_nailgun
  origin/master
One thing to notice here is that there’s a branch for the stable release of version 1 which is the current version of the gem. The master branch points to version 2 which is currently in pre-release. This is something to keep in mind: the version of the gem that you’re using may different from the one you’re working on in the code.
When setting up the development environment for a project it’s a good idea to check the documentation. In this case there’s a development section in the README file that tells us that pull requests are welcome, but that any changes we made need to be fully covered by tests. The README doesn’t have any instructions on running the gem’s test suite but it’s encouraging to see that Travis CI says that the tests are all currently passing.
The project has a Gemfile so it uses Bundler to manage its dependencies. We should be able to install these by running bundle install but when we try this we see an error. This is to be expected as every system is set up differently so we should expect to run into a couple of hiccups when we try to set up a project in our environment.
The error we see is related to the rb-fsevent gem and a quick search tells us that this problem is related to our set up. We’re using the GCC Installer rather than the full Xcode install on OS X and the current version of won’t install this way. This problem has now been fixed in rb-fsevent but the fix isn’t yet in a stable release. We can solve this problem by setting the version of rb-fsevent in the Gemfile to the current pre-release version.
When we run bundle now everything installs correctly.
Running The Tests
Next we’ll try to run the gem’s tests. This is often set as the default Rake task so we should be able to run them by running rake. It’s better, though, to run bundle exec rake though so we know that it’s using Bundler.
$ bundle exec rake
  1504/1504:   100% |==========================================| ETA:  00:00:00
The tests pass with a few pending issues which is fine. After the tests have run the Cucumber scenarios are executed. We get one failure here with a long error message, the nub of which says “no such file to load -- spec”. It looks like we’re missing a dependency that Bundler hasn’t set up.
After some investigation it turns out that this project uses Git submodules so to get it working we need to run these two commands.
$ git submodule init
$ git submodule update
These will copy over the submodule repository for us. We can try running the tests again now and see if they pass and this time they do.
Making The Changes
We ran into a couple of problems getting the tests to pass but we’ve finally made it. This is to be expected as everyone’s development environment is different. We could have saved some time if the documentation has been better on getting the project set up. So, our first pull request will be to add some better documentation to the README file for setting up the development environment.
It turns out that there’s already a wiki page dedicated to contributing to the VCR project, but it only contains the basics on getting set up. We’ll edit this page to add some more information based on the problems we’ve had. Once we’ve made our changes we can submit a pull request which adds a link to the README for this contributing guide.
Before we make any changes to the code we’ll make sure we have a clean working directory.
$ git status
# On branch master
# Changes not staged for commit:
#   (use "git add <file>..." to update what will be committed)
#   (use "git checkout -- <file>..." to discard changes in working directory)
#
#	modified:   Gemfile
#
no changes added to commit (use "git add" and/or "git commit -a")
As we’ve modified the Gemfile we’ll revert this change before we go any further.
$ git checkout .
noonoo:vcr eifion$ git status
# On branch master
nothing to commit (working directory clean)
It’s a good idea to setup a separate Git branch for each pull request we want to make so we’ll do that now.
$ git checkout -b readme-contributing-link
Now we can make our change. In the development section of README.md we’ll add a link to the wiki page we just changed.
/README.md
## Development
* Source hosted on [GitHub]
* Direct questions and discussions to the [mailing list](http://groups.google.com/group/vcr-ruby).
* Report issues on [GitHub Issues].
* Pull requests are very welcome! Please include spec and/or feature coverage for every patch,
  and create a topic branch for every separate change you make.
* See the [Contributing](myronmarston/vcr/blob/master/CONTRIBUTING.md)
  guide for instructions on running the specs and features.
Once we’ve made our changes we can run git diff to see the changes we’ve made. If we’re happy with them we can commit them by running
$ git commit -a -m "adding contributing link to readme."Next we need to push our branch to our remote repository.
$ git push origin readme-contributing-link
Counting objects: 5, done.
Delta compression using up to 2 threads.
Compressing objects: 100% (3/3), done.
Writing objects: 100% (3/3), 328 bytes, done.
Total 3 (delta 2), reused 0 (delta 0)
To git:eifion/vcr.git
 * [new branch]      readme-contributing-link -> readme-contributing-link
This will add the branch to our Github repository.
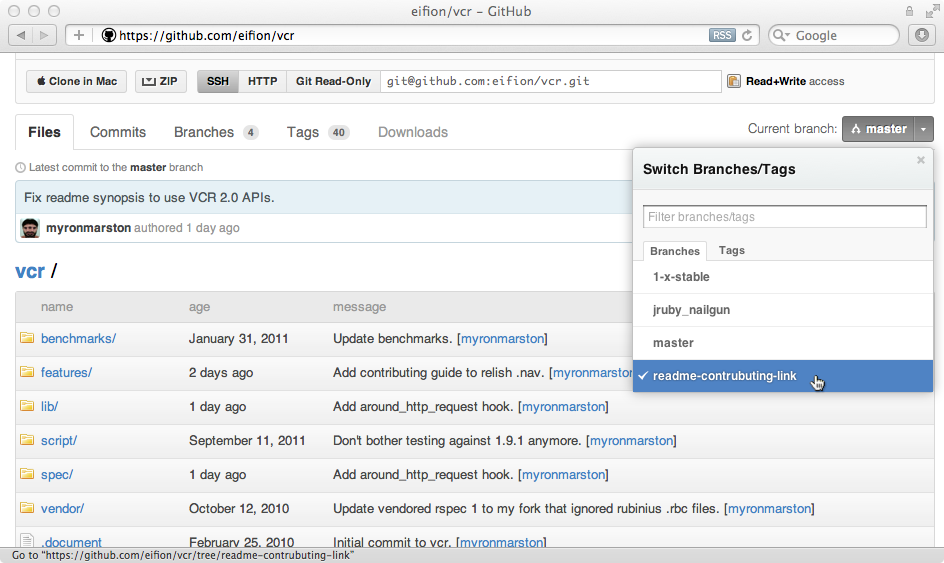
When we visit our forked repository on Github now we can change the current branch to the one we just added.
We can then click “Pull Request” to submit our pull request to the original owner. We’ll need to fill in a form explaining the changes we’ve made and then we can send off our request.
That’s all we need to do to submit a pull request to an open source project on Github. If it’s accepted our change will make it easier for the next person who want to contribute. Now it’s your turn.