
182: Cropping Images
(view original Railscast)
Other translations:

In this episode we’re going to use Paperclip and a jQuery plugin called Jcrop to crop images on a web page. Say we have a Rails application, for example a forum, that allows users to register with a username and an avatar graphic to represent themselves.
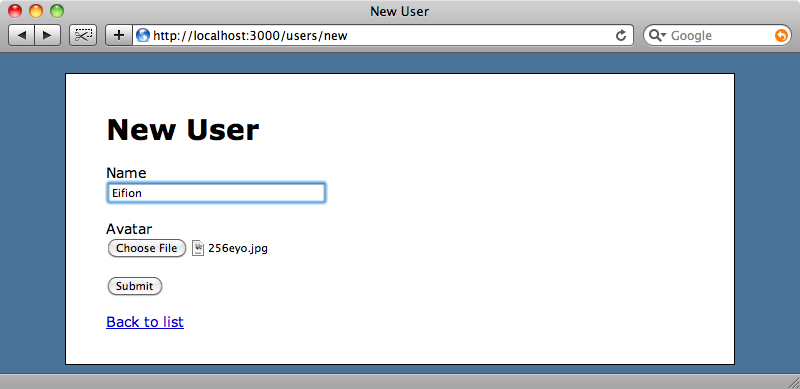
The image that a user chooses to upload could be of any size, so our application will resize and crop it down to 100 pixels square.
The application uses Paperclip to automatically crop and resize the image, but we’d like the user to have some control over how the cropping is done. We can make use of some JavaScript to do just that and we’ll show you how to do it in this episode.
If you’re unfamiliar with Paperclip it was covered back in episode 134 and it’s worth watching or reading that episode first to get an understanding of how to use it to add attachment fields to your models as this episode will build on that one.
There are a number of JavaScript image cropping libraries available; we’re going to use a library called Jcrop, which is a jQuery plugin. If you’re using Prototype and Scriptaculous instead of jQuery the JavaScript Image Cropper UI library provides similar functionality.
Creating a Cropping Page
In our application we have a User model that’s set up to use Paperclip.
class User < ActiveRecord::Base
  has_attached_file :avatar, :styles  => { :small => "100x100#" }
end
The avatar attribute has a style that will crop the image to 100x100. We want to create another, larger version of the image that we can show to the user and from which they can crop their avatar. We could show the original uploaded image but that could be of any size or aspect ratio and might mess up the layout of our application. It’s better to add another style that provides an image of a known size to the user and which they can use for cropping.
has_attached_file :avatar, :styles => { :small => "100x100#", :large => "500x500>" }
The new large style will resize the image to fit within 500x500 pixels, but as we’ve used “>” rather than “#” after the size, Paperclip will maintain the aspect ratio so that the image isn’t cropped.
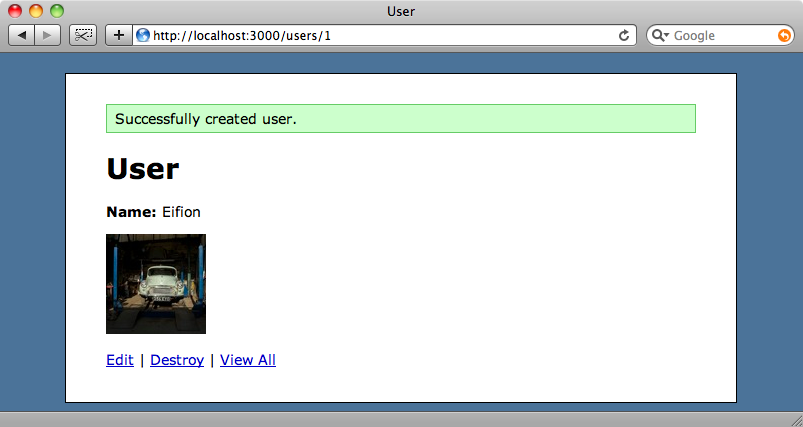
Our aim is to modify our application so that when a user registers and uploads an image or modifies their avatar they’re redirected to a page on which they can crop the image they’ve just uploaded. To do this we’ll need to modify the create and update actions in our UsersController and create a new action (and associated view) called crop.
We’ll modify the create action first. If no avatar is supplied the application will redirect as it did before, but if an image was uploaded then the new crop action will be rendered.
def create
  @user = User.new(params[:user])
  if @user.save
    flash[:notice] = "Successfully created user."
    if params[:user][:avatar].blank?
      redirect_to @user
    else
      render :action => 'crop'
    end
  else
    render :action => 'new'
  end
end
Likewise, when a user is updated we want to show the crop view if a new image has been uploaded.
def update
  @user = User.find(params[:id])
  if @user.update_attributes(params[:user])
    flash[:notice] = "Successfully updated user."
    if params[:user][:avatar].blank?
      redirect_to @user
    else
      render :action => 'crop'
    end
  else
    render :action => 'edit'
  end
end
We’ll create the new view file at /app/views/users/crop.html.erb. This file will need to contain references to the CSS and JavaScript files that Jcrop uses as well as a reference to the jQuery library. In our application’s layout file we have a yield section in the head that will allow us to insert content into the <head> section of the page from our view file. We already have a reference to the jQuery library so we don’t need to worry about that.
<head>
  <title><%= h(yield(:title) || "Untitled") %></title>
  <%= stylesheet_link_tag 'application' %>
  <%= javascript_include_tag 'jquery.1.3.2.min' %>
  <%= yield(:head) %>
</head>
We’ll give our new page a title, then create a content_for block to hold the code that will go into the head section in our template. This will consist of a link to Jcrop’s stylesheet and JavaScript, which we’ve downloaded and copied into the appropriate folders in our application, and some inline JavaScript which will cause any element with an id of cropbox to have the Jcrop functionality applied to it.
Finally we render the image itself in the body of the page, giving it an id of cropbox so that the jQuery code we wrote is applied to it.
<% title "Crop Avatar" %>
<% content_for (:head) do %>
<%= stylesheet_link_tag "jquery.Jcrop" %>
<%= javascript_include_tag "jquery.Jcrop.min" %>
<script type="text/javascript">
$(function() {
$('#cropbox').Jcrop();
});
</script>
<% end %>
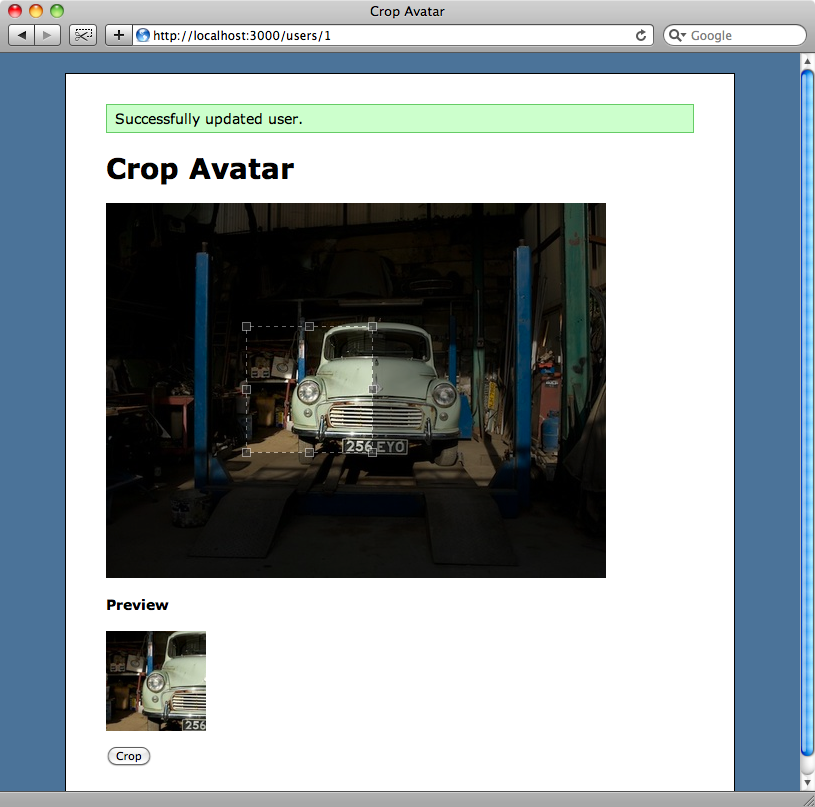
<%= image_tag @user.avatar.url(:large), :id => "cropbox" %>
If we edit a user now and upload a new image file we’ll be redirected to the new crop action where we’ll see the large 500x500 version of the image with Jcrop functionality. The cursor will turn into a crosshair when it is over the image it and we can select a section by dragging over a section of the image.
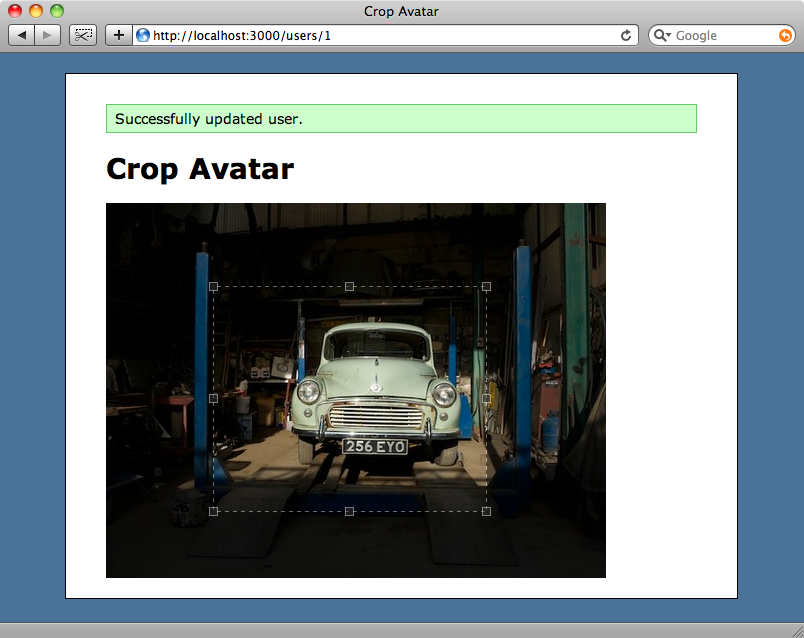
We can now select part of the image, but there’s no way we can crop it yet. To do that we’ll add a form to the page that will contain fields that hold the width and height of the cropped image, along with the x and y coordinates of the top-left corner of the cropped area, along with a “crop” button.
As the avatar is an attribute of the User model, the new form will modify a user. We’ll need to create four new attributes in the model to hold the coordinates of the cropped area.
class User < ActiveRecord::Base
  has_attached_file :avatar, :styles  => { :small => "100x100#", :large => "500x500>" }
  attr_accessor :crop_x, :crop_y, :crop_w, :crop_h
end
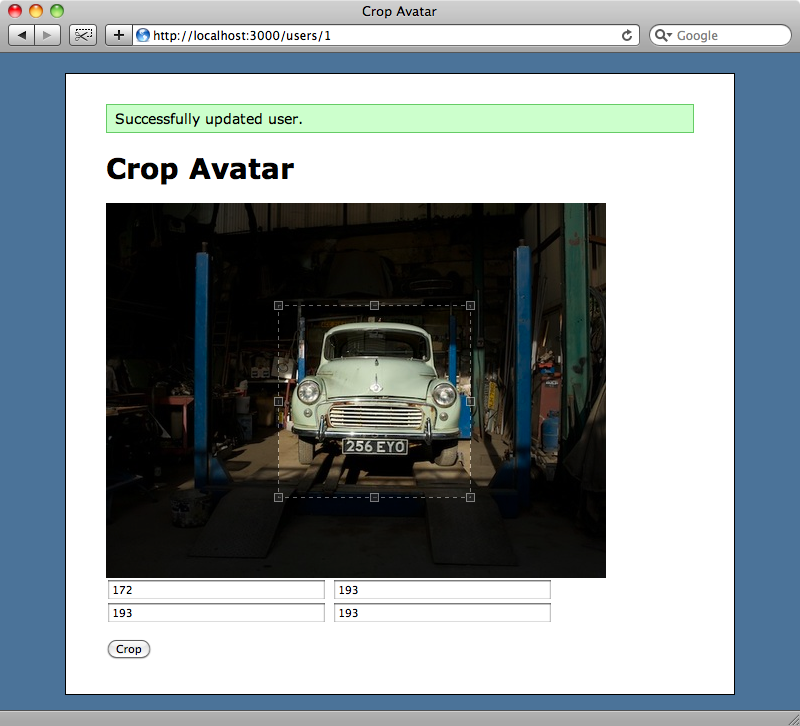
Now that we’ve added the new attributes we can create the form. We’d normally use hidden fields to store the cropped area’s coordinates, but while we’re developing our page we’ll use text fields so that we can see the values that are being stored. The code for the form belongs immediately below the image in the crop view.
<% form_for @user do |form| %>
  <% for attribute in [:crop_x, :crop_y, :crop_w, :crop_h] %>
    <%= form.text_field attribute, :id => attribute %>
  <% end %>
  <p><%= form.submit "Crop" %></p>
<% end %>
We’ve given each text field in the form an id so that we can update the fields’ values from JavaScript. To update the fields when the cropped area changes we’ll have to add some options to the call to Jcrop.
$(function() {
  $('#cropbox').Jcrop({
    onChange: update_crop,
    onSelect: update_crop,
    setSelect: [0, 0, 500, 500],
    aspectRatio: 1
  });
});
Jcrop has two main event handlers, onChange and onSelect, that fire when the selection changes or moves. We’ll specify a callback function that will fire when either of these events occurs. We’ve also defined two other options: setSelect which defines the initial cropping rectangle and aspectRatio which defines the ratio of the width to the height of the cropping rectangle, which we’ve set to 1, so that only a square area can be selected.
We’ll also need to write the update_crop callback function. This is passed a coordinates object from which we can extract the x, y, width and height values and pass them to the appropriate form fields. This function goes immediately below the one above.
function update_crop(coords) {
  $('#crop_x').val(coords.x);
  $('#crop_y').val(coords.y);
  $('#crop_w').val(coords.w);
  $('#crop_h').val(coords.h);
}
If we reload the page now we’ll see the form fields with values that represent the current cropping area. As we move and resize the cropping areas the values in the textboxes will change.

When we click the “crop” button the User model is updated. We need to tell Paperclip to reprocess the attached file if we’re cropping it. We can do this by using an after_update filter that will reprocess the image if it has just been cropped.
class User < ActiveRecord::Base
  has_attached_file :avatar, :styles  => { :small => "100x100#", :large => "500x500>" }
  attr_accessor :crop_x, :crop_y, :crop_w, :crop_h
  after_update :reprocess_avatar, :if => :cropping?
  def cropping?
    !crop_x.blank? && !crop_y.blank? && !crop_w.blank? && !crop_h.blank?
  end
  private
  def reprocess_avatar
    avatar.reprocess!
  end
end
The after_update filter will be called if the four cropping values have been passed from the form. If they have then Paperclip’s reprocess! method will be called.
We still need to tell Paperclip how to reprocess the image, using the coordinates passed from the form. To do that we’ll have to write a new custom processor for Paperclip, but before we do we’ll specify the processor in the User model.
has_attached_file :avatar, :styles => { :small => "100x100#", :large => "500x500>" }, :processors => [:cropper]
It’s customary to place any custom processors in a paperclip_processors directory under the /lib directory. We’ll create that directory and in it a new file called cropper.rb, which will contain this code:
module Paperclip
  class Cropper < Thumbnail
    def transformation_command
      if crop_command
        crop_command + super.sub(/ -crop \S+/, '')
      else
        super
      end
    end
    def crop_command
      target = @attachment.instance
      if target.cropping?
        " -crop #{target.crop_w}x#{target.crop_h}+#{target.crop_x}+#{target.crop_y}"
      end
    end
  end
end
A custom Paperclip processor has to go inside the Paperclip module. Our processor inherits from the Thumbnail processor which is Paperclip’s default. Thumbnail has a transformation_command method which we’re overriding because we want to add our own command options. In our transformation_command method we check for any existing cropping command using a regular expression and replace it with our own, based on the attributes in the User model.
Selecting The Correct Part of The Image
Now that we’ve written our processor we can try to crop our image and see if it’s working as expected. We’ll select the car from the image we’ve uploaded and click ‘crop’.
The result almost works. Our image is cropped, but not in the right place.
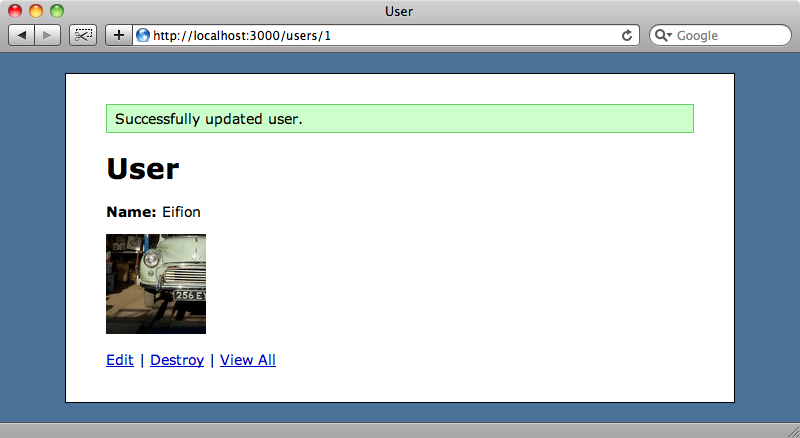
This hasn’t worked because the image the user sees is the large style, which has already been resized and the cropping coordinates are based on this resized image. The image that Paperclip crops is the original uploaded image so we need to compensate between the two different image sizes so that the image is cropped correctly.
We can get the size of the original image by making use of Paperclip’s Geometry.from_file method. In our User model we’ll write a new method that will get the image’s dimensions and cache them in an instance variable.
def avatar_geometry(style = :original)
  @geometry ||= {}
  @geometry[style] ||= Paperclip::Geometry.from_file(avatar.path(style))
end
In the crop view we can then modify the JavaScript that sets the form values when the crop selection changes so that it takes into account the size of the original image. We do this by calculating the ratio of the original image’s width to the width of the image that is being cropped and then multiplying all of the values by that ratio.
function update_crop(coords) {
  var ratio = <%= @user.avatar_geometry(:original).width %> / <%= @user.avatar_geometry(:large).width %>;
  $('#crop_x').val(Math.floor(coords.x * ratio));
  $('#crop_y').val(Math.floor(coords.y * ratio));
  $('#crop_w').val(Math.floor(coords.w * ratio));
  $('#crop_h').val(Math.floor(coords.h * ratio));
}
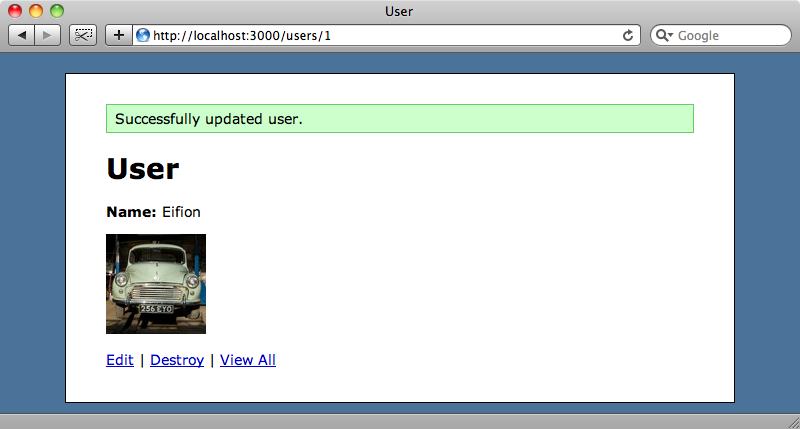
If we select the front of the car now and crop it, the correct area of the image is cropped.
Adding a Preview Image
The last thing we’ll do in this episode is add a preview image to the cropping page so that a user can see exactly what their avatar will look like before they click the crop button.
Back in the crop view we’ll add a preview section between the large image and the form. This will show the large image but in a div which is restricted to 100x100 pixels and which hides any overflow. Now is also a good time to replace the text fields that show the coordinates with hidden fields.
<%= image_tag @user.avatar.url(:large), :id => "cropbox" %>
<h4>Preview</h4>
<div style="width: 100px; height: 100px; overflow: hidden;">
  <%= image_tag @user.avatar.url(:large), :id => "preview" %>
</div>
<% form_for @user do |form| %>
  <% for attribute in [:crop_x, :crop_y, :crop_w, :crop_h] %>
    <%= form.hidden_field attribute, :id => attribute %>
  <% end %>
  <p><%= form.submit "Crop" %></p>
<% end %>
We’ve given the preview image an id of preview so that we can reference it from the JavaScript. We’ll modify our callback function so that it updates the preview image whenever the cropping area changes.
function update_crop(coords) {
  var rx = 100/coords.w;
  var ry = 100/coords.h;
  $('#preview').css({
    width: Math.round(rx * <%= @user.avatar_geometry(:large).width %>) + 'px',
    height: Math.round(ry * <%= @user.avatar_geometry(:large).height %>) + 'px',
    marginLeft: '-' + Math.round(rx * coords.x) + 'px',
    marginTop: '-' + Math.round(ry * coords.y) + 'px'
  });
  var ratio = <%= @user.avatar_geometry(:original).width %> / <%= @user.avatar_geometry(:large).width %>;
  $('#crop_x').val(Math.floor(coords.x * ratio));
  $('#crop_y').val(Math.floor(coords.y * ratio));
  $('#crop_w').val(Math.floor(coords.w * ratio));
  $('#crop_h').val(Math.floor(coords.h * ratio));
}
The preview image will now be updated as soon as the cropping area changes which means that as the cropping square is dragged around or resized the user will see a live update of what their avatar will look like.
That’s it for this episode. If you want to take these ideas a little further it’s worth taking a look a jschwindt’s rjcrop project on Github which is an example Rails application that does something similar to what we’ve shown here.