
412: Fast Rails Commands
(view original Railscast)
Other translations:

You’re probably aware that the various Rails commands can be a little slow to run. If we run, say, a generator for a Rails application there is a delay of several seconds before we see any output. This is because the application is started up when these commands are run and this is most noticeable when running tests as these are run often when a application is in development. This wait time only grows as the application gets larger. In this episode we’ll show you a few different tools that we can use to make these commands run much more quickly.
Zeus
The first one of these is called Zeus and it preloads Rails applications so that we can run commands against them almost instantly. It has some fairly strict requirements, however, and you’ll need to be running a recent version of OS X or Linux and Ruby 1.9.3 with the garbage collection patch to use it. It does seem to work without that patch applied but it might be necessary to use it if you have limited RAM. To install it we just need to run gem install zeus. We shouldn’t add it to an application’s gemfile as it’s designed to run outside Bundler with the zeus command. Once it’s installed we can run zeus start to preload our application.
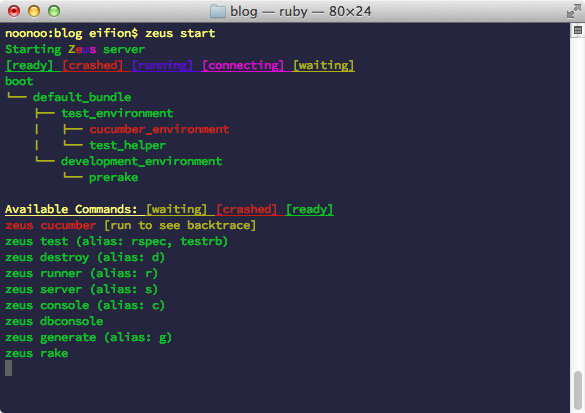
As the Rails app loads up this output will change. For our app most of it has turned green which means that we can use these commands against our application. If we open up another terminal tab we can run another generator by running zeus generate (or zeus g for short) instead of the usual Rails generator command.
$ zeus g model comment content
Similarly, instead of running rake db:migrate we need to prefix this (and any other Rake commands) with zeus.
$ zeus rake db:migrate
This also runs more quickly now and if we run tests with zeus rake test they also run much faster than before. We can run a specific test file or directory with zeus test so to run just the functional tests we’d use zeus test test/functional.
Now that we don’t have to start up our Rails application every time we run one of these commands the output appears much sooner. Zeus works by preloading Rails in the different environments, development and test, and if we had Cucumber set up in this app it would work for that as well. This means that we can run commands against these preloaded environments. Zeus is also smart about reloading any changes. If we make a change to a model, for example, then this will be picked up automatically and we won’t have to reload Zeus. Let’s compare the time taken to run a command with and without Zeus. We’ll try running the database migrations.
$ time bundle exec rake db:migrate
real  0m4.054s
user  0m3.409s
sys 0m0.569s
$ time zeus rake db:migrate
real  0m1.246s
user  0m0.553s
sys 0m0.162s
This command took four seconds to run without Zeus but completed in less than a second with it. The difference will depend a lot on the size of the application so it’s a good idea to try it with your applications to see how much difference it makes.
One thing that’s good about this setup is that is allows us to better integrate Rails commands into our text editor for really fast feedback. For example if we’re using Textmate we can set it up so that putting the cursor within a test then using a keyboard shortcut would run a that test and show the results as a tooltip. This is done by creating a custom Textmate bundle that moves into the current project’s directory and runs zeus test for the current file at the selected line.
tmbundle
cd "$TM_PROJECT_DIRECTORY"
zeus test "$TM_FILEPATH:$TM_LINE_NUMBER"
One thing to be aware of when running Zeus is that it generates a .zeus.sock file at the root of our project and we’ll generally not want to check this in to source control. It’s a good idea to add it to the .gitignore file if you’re using Git.
Spring and Commands
Zeus is one way to speed up our Rails commands but it isn’t the only one. Let’s take a look at another couple of options. One similar tool is called Spring which also speeds up commands by preloading a Rails application although there are a few noticeable differences from Zeus. To install it we run gem install spring and after it has installed we’ll have a spring command that we can use much like the zeus command. We can run Rails and Rake tasks through spring but one difference is that it automatically boots up our Rails application in the background on the first command. This means that the first command we run through it still takes a while to complete as it boots up our Rails app. Each subsequent command should run nearly instantly as it runs on the process that has already booted up.
Using Spring means that we don’t have to worry about starting our Rails application up through a special command to start it up and if we want to stop it at any time we can just run spring stop or close the terminal session. Another nice feature of Spring is that it is very configurable. We can easily change how the preloading works and which directories are watched. We do need to be aware, though, that it doesn’t use fsevent by default to detect file changes but instead polls five times a second. The README has instructions on adding the necessary gems to the app’s gemfile to get it to use fsevent instead if you’re on OS X or inotify for Linux.
The last tool we’ll show here is called Commands. This is a much simpler approach as it doesn’t try to preload our Rails app. Instead it gives us a way to run Rails commands from the Rails console. Unlike the other two tools this one is designed to be added to our application’s gemfile so we install it by adding it there then running bundle to install it.
/Gemfile
gem 'commands', group: [:development, :test]
Once it has installed we can open our application’s console and run various generators and Rake tasks.
console
>> generate "model author name"
>> rake "db:migrate"
As our application is already loaded in the console these commands will run very quickly. Unfortunately we can’t run tests from here as the console loads the development environment by default. We’ll need to open a console in the test environment to do so by running rails console test.
console
>> rake "db:migrate"
>> test "functional"
Before we ran our tests we ran rake "db:migrate" so that the test database was migrated. We can then run tests with a test command, specifying the directory for the tests we want to run. The default output is quite noisy as it shows all the SQL commands that are being run. We can stop thing from happening by running ActiveRecord::Base.logger = nil in the console before running the tests. Commands doesn’t yet support RSpec commands, but this is planned for the future.
We’ll end this episode by quickly mentioning Spork which was covered in episode 285. This is designed to speed up the test environment by preloading Rails and works in a similar way to the other tools we’ve demonstrated. This is a little dated now and doesn’t support other Rails commands. If the other tools don’t do what you want then it’s worth considering, especially if you’re using Windows or JRuby.